10 DIY Penguin Crafts Using Simple Materials
Let's make some cute DIY penguin crafts together by getting inspiration from this amazing list of ideas! These projects are about turning simple things like paper plates and cotton balls into adorable little penguins. Kids of all ages can join in, and it's a fun way to make something lovely. You'll paint, glue, and even dress up the penguins with fun touches like googly eyes. You'll have several other customization options below. Each craft tells you what to do step by step, so it's easy to follow along. So, get ready for some crafting fun and new penguin pals!
DIY Penguin Crafts

We have made it easy for you with clear, simple steps so that you can create these cute little penguins on your own or with your family. Just choose one of our ideas, gather your materials, and start creating. Whether it is a rocking penguin or one with fluffy cotton ball feathers, you can make something amazing following the easier ideas we provided. These DIY penguin crafts are perfect for a cozy afternoon filled with smiles and creativity.
DIY Cardboard Penguin

Creating DIY Cardboard Penguins is a fun and budget-friendly holiday activity that allows you to repurpose cardboard from packaging. The process involves printing out penguin templates and tracing them onto cardboard, including front and side views, for a 3D effect. Next, cut out the penguin shapes from the cardboard, ensuring to cut slits to attach the two pieces.
The next step is painting the penguins. The adults are typically painted in black and white, while the baby penguins can be painted grey and white. Finally, when the paint has dried, you slot the two penguin pieces together to form a 3D cardboard penguin. This project, suitable for children and adults, generates unique and fun Christmas decorations leveraging recyclable materials.
Penguin Paper Bag Puppet Craft

Here, we came up with a super fun and easy craft for kids: making a Penguin Paper Bag Puppet! You'll need basic things like a paper bag, colored paper (black, yellow, and blue), white paper, glue, scissors, and a template for the penguin parts. First, using the template, you'll cut out pieces for the penguin's body, face, beak, and other parts.
Next, stick the black paper on the paper bag to make the penguin's body. Then, you'll glue the white part on the top flap for its face and the middle for its belly. Add the beak and eyes to the face, the feet to the bottom, and don't forget the flippers on the sides. You can even make a cute scarf for your penguin to wear. It’s a really fun project that lets kids be creative and have their penguin puppet to play with afterward!
Paper Plate Penguin Craft

Imagine transforming a simple paper plate into an adorable penguin friend with just a few magical touches. You'll gather some paint, colorful paper, a marker, glue, scissors, and a helpful penguin template. Begin by painting the rim and a bit at the top of your plate black, leaving the center white.
This black and white plate will soon resemble our penguin's body. Once dry, it's time to bring our penguin to life: glue the eyes onto the white space, pop the beak right below, and attach those cute webbed feet at the bottom. Don’t forget the flippers on the sides, as if our penguin is ready for a warm hug. Voila! With every step, we've turned a plain paper plate into a cheerful penguin buddy, ready to slide into a winter wonderland of imagination.
Penguin Rock Painting For Kids

Put your hands on this fun, winter-themed craft activity with Penguin Rock Painting for Kids. That's an engaging project that brings the joys of rock painting to your home and blends creativity with an appreciation for cold-weather animals—penguins! Children can bring their creativity and refine their fine motor skills using simple materials such as smooth rocks of different sizes, tempera paint in black, white, and orange, and optional glitter for extra sparkle. The step-by-step guide encourages patience and creativity, allowing kids to transform ordinary rocks into adorable penguin masterpieces that could brighten up any garden, porch, or playroom.
Paper Bag Penguin Craft

This DIY Paper Bag Penguin Craft is an easy and fun project perfect for adding to your penguin-themed lessons or simply enjoying after reading a favorite penguin story. To get started, you only need a handful of materials: a white paper bag, construction paper, glue, scissors, and the free penguin template provided on the website. First, read a captivating penguin book to spark excitement. Then, cut out and glue the penguin parts onto the paper bag – flippers on the sides, head, eyes, and beak on the top, and feet at the bottom. This craft fuels creativity and helps develop fine motor skills, hand-eye coordination, and more.
How To Paint Penguin Rocks
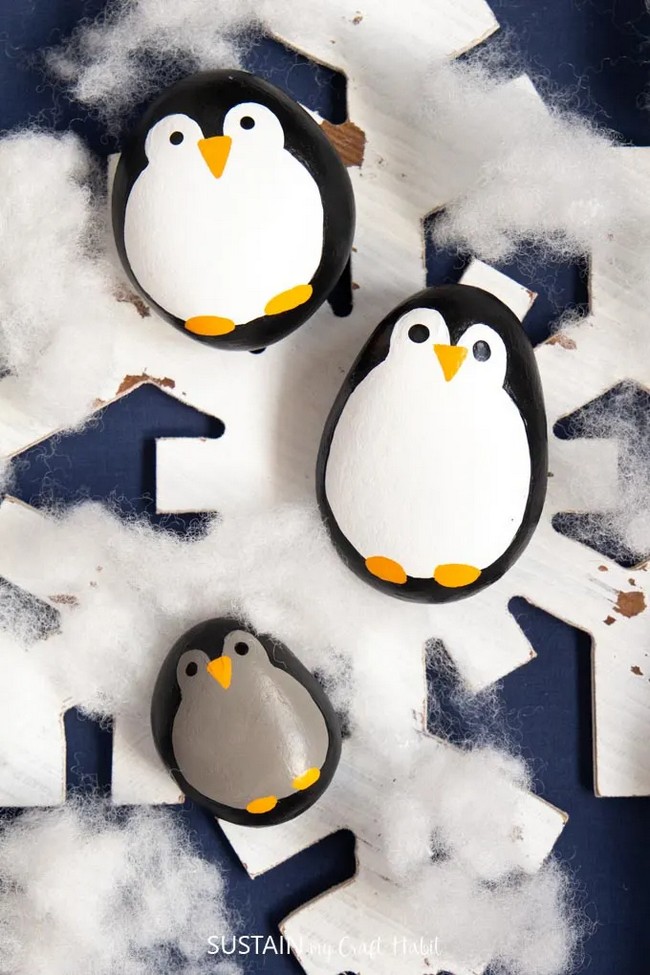
Let's create some winter charm with "How to Paint Penguin Rocks," a fantastic art project for all ages. You will need a set of three rocks of various sizes, but ensure they have a smooth surface. Also, prepare some paint in Black Tie, Steel Grey, Cotton Ball, and Orange Sherbet and keep some paintbrushes handy. Begin by painting the topside of each rock in the Cotton Ball and Steel Grey colors for the adult and baby penguins, respectively. After that, frame your penguin with a Black Tie color around the white and grey areas. Paint the back of the rocks in black, then add a small orange triangle for the beak and two orange rectangles for the feet. Finally, create eyes by dabbing the back end of your paintbrush in black paint and gently pressing it onto the rock.
Popsicle Stick Penguin Craft

This fun, hands-on craft is a perfect winter activity that combines creativity, fine motor skills development, and unending fun! Begin by aligning the popsicle sticks, securing them together with an eighth popsicle stick glued diagonally across. Paint this assemblage black. Next, cut out the penguin's body and flippers from the cardboard, painting them white and black, respectively. Once dried, these elements are glued onto the popsicle stick base for a delightful 3D effect. With the addition of googly eyes, a beak, and feet from the cardstock paper, your basic penguin takes shape. Make it special with unique embellishments like a pipe-cleaner-and-pom-pom earmuff or a paper hat adorned with snowflake jewels.
Paper Plate Penguin

Enjoy making this fun and easy Paper Plate Penguin craft with your little ones. For this project, you will need a paper plate, black paint, a brush, glue, and small pieces of orange, black, and white paper. Start by folding the top and sides of the paper plate and glue them still. Next, let your child paint the folded parts black and let it dry. Cut out the beak and feet from the orange paper and eyes from the black and white paper. When the plate is dry, stick these pieces to create your penguin. This craft is a great way for young children to practice their fine motor skills while having fun.
Rocking Paper Plate Penguin Craft

Put your hands on this Rocking Paper Plate Penguin Craft made with just a few supplies. Begin by cutting a paper plate in half to form two penguins. Next, roll each half into a cone shape and secure it with glue or staples. Now comes the fun part: decorating! Paint the back and wings of your penguin black, add an orange paint beak, and stick on two wiggle eye stickers for a playful touch. You can even tie some yellow yarn on top to mimic royal penguins. This budget-friendly project is great for a classroom setting, promising lots of wobbly penguin friends to play with.
Cotton Ball Paper Plate Penguin Craft

Create a cute Cotton Ball Paper Plate Penguin craft with simple materials. You'll need a paper plate, black paint, black and orange paper, glue, big googly eyes, white cotton balls, colorful pom-poms, pipe cleaners, a hole punch, and scissors. First, paint your paper plate black and wait for it to dry.
Then, glue a circle of cotton balls in the center for the belly. Stick on the big googly eyes and cut a small beak from the orange paper. Also, cut and stick on feet from the orange paper. Next, make flippers from the black paper and attach them to the sides. Punch two holes above where the flippers are and thread a pipe cleaner through for earmuffs, securing it at the back. Finally, glue a pom-pom over each hole to complete the earmuffs. Moreover, there you have it: an adorable paper plate penguin with earmuffs!