10 DIY Hat Rack Ideas For Everyone
DIY Hat Rack Ideas is a super fix for keeping your fancy hats neat and easy to reach! These fun DIY projects will quickly change your space, making it clean and tidy while showing off your top accessories. With many styles and looks, like wooden hat racks and macrame hat holders, there's a DIY hat rack idea for everyone and every home style. Visit this list and see how simple it is to create your own hat holder!

DIY Hat Rack Ideas
If you have an extensive collection of hats or just a few, our creative hat organization ideas will surely please you. In addition to the hat rack, some of our DIY ideas also serve as jewelry hangers, shelves, coats, and bag hangers. Our collection contains everything, whether you want it hanging on the wall, standing alone, or specially designed for specific hats like baseball caps or cowboy hats. These ideas are easy to make, thanks to the detailed instructions in this post and the step-by-step guides in the links.
Different mounting styles of Hat rack ( which one is best)
- Wall Mounted Hat Racks: These racks are attached directly to the wall, saving much floor space. They are suitable for small spaces with limited room.
- Freestanding Hat Racks: These racks stand alone and can be placed anywhere in your room. They usually have a taller design that can hold more hats.
- Door Mounted Hat Racks: These racks attach to the back of a door, allowing you to utilize often-neglected space, perfect for smaller rooms or apartments.
- Ceiling Mounted Hat Racks: These clever models hang from the ceiling, adding an interesting design element to your room and serving a practical purpose.
- Specific Hat Racks: These racks are specially designed for certain types of hats, such as baseball caps or cowboy hats. They help to maintain the shape and integrity of these specific styles.
Simple Coat Rack And Hat Rack

Create a clutter-free entryway using this DIY sleek and simple coat and hat rack. It is easy to set up, can fit anywhere, and can be painted to match your interior. You can pick any type of wood you want. It also has hooks and pulls for hanging big items like backpacks.
To make a sleek coat and hat rack, measure and cut a board to your desired size. Apply primer and paint, then add various hooks for diverse items. Secure the board to the wall using studs or drywall anchors, ensuring stability with at least three screws. This simple yet stylish rack will provide a convenient storage solution for coats and hats.
Materials:
- 1x4 board
- Drywall anchors
- Hooks
- Paint
- Primer
- Sandpaper
DIY Wall-Mounted Hat Rack

Create an elegant DIY wall-mounted hat rack by cutting dowels to equal lengths and sanding edges for a smooth finish. Paint or stain the dowels as desired, then attach them to a mounting board at equal intervals. Secure the completed rack to the wall with robust hardware, achieving a visually pleasing and functional organization solution for your hats.
Materials:
- Wooden Board
- Wooden Pegs
- Wood Glue
DIY Dowel Wall Hooks

With this DIY wall-mounted hat rack, you can maintain an organized space. It offers good storage without affecting aesthetics. You can display straw hats during summer and swap for woolly scarves and felt fedoras in the winter. Remember, the larger the rack, the greater its visual impact.
Bring this DIY creation to your home by cutting dowels to chosen lengths, forming a flat edge on one end. Drill a hole for screw insertion, then apply paint or stain for a personalized touch. Mount the dowels on the wall with durable screws, generating a set of individual hooks perfect for hanging a variety of items in an aesthetically appealing manner.
Materials:
- 1-¼-inch wood dowel
- Mitre box
- Sandpaper
- Drill + drill bit
- Pliers
- ¼” x 2” dowel screw
- 5/16” drywall anchors
DIY Copper Hat Rack

This stylish DIY Copper Hat Rack provides an elegant, space-saving solution to showcase and organize your hat collection. The curtain rod rings with clips make it easy to attach hats, giving you the flexibility to customize the arrangement and add new pieces. So, get ready to give your hats the display they deserve!
First, figure out where you want to hang your rack, considering the width and quantity of your hats. Secure one pipe strap onto the wall using a hammer and nail or screws. End caps are applied to both ends of the copper pipe, and curtain rod rings are slid on it. Put this copper pipe into the pipe strap. Ensure the pipe is straight before securing the other end of the pipe with another pipe strap. Finally, attach your hats to the curtain rings.
Materials:
- 2 copper end caps (½″ diameter)
- 2 copper pipe straps (¾″ wide)
- Curtain rod ring with clips
- Hammer
- Nails or screws
- Leveler (optional)
DIY Hat Rack

This DIY Rope Hat Rack is the perfect solution for hat lovers who want to store their collections stylishly without crushing or damaging them. The design is flexible, allowing you to customize its length based on the size of your wall and to layer the ropes for optimal hat spacing. This rack isn't just functional storage - it's practically a work of art!
Begin by measuring your wall to determine the size of the rack. Cut two length pieces and one-half piece to layer them for optimal spacing. Using your widest hat as a reference, attach hooks to the wall. Attach ropes to your hooks and trim the ends. You might want to add and stagger the third rope for better hat placement. Now, start from the top and clip your hats onto the ropes, layering them underneath to hide the clips for a clean finish.
Materials:
- Rope
- Hooks
- Hammer
- Clips
DIY Diamond Hat

Create a blend of functionality and style in your space with this DIY Diamond Hat and Coat Rack. Created with easy-to-find materials like birch boards and six shiny gold knobs, this patterned rack brings a special touch to your entryway or workspace. It's ideal for hanging hats, bags, and more.
Decide where you want your diamond-shaped rack on your wall. Cut four pieces of wood at a slant to make the diamond. Where the wood overlaps, cut extra. Connect the parts using flat repair braces at the back. Cover any flaws where the pieces meet, fill them, and smooth them when dry. Apply a layer of protection. Use tape to make a line down the middle, then paint it twice. After it dries, put another protector layer for a glossy look and safety. Add hangers at the back and put the knobs where they fit best.
Materials:
- Two 8-foot long 3" x ½" birch boards
- Flush mount hangers
- Four mending brackets
- Polycrylic protectant
- White paint
- Wood filler
- Six brushed brass knobs
DIY Trophy Shelf and Hat Rack

This project includes a shelf for trophies and a rack for hats. It's great for sports fans who like to collect hats. The DIY Trophy Shelf and Hat Rack provides a special place to display your prized trophies and to hang your favorite hats neatly.
Making this DIY project is quite easy and straightforward to make. You will start by building the frames. After assembly, fill in the pocket holes. Once filled and dry, paint the frames. Now, finish the shelves, which includes sanding and notching the corners. Next, cut the backers for the hat rack and finish all the pieces. Router keyhole slots to hang the shelf unit flush on the wall. Afterward, attach the shelves to the frame and the backer boards for the hat rack. Install the hooks, then hang the shelves on the wall.
Materials:
- 2×2 wood for the frames
- Boards for the shelves
- Wood glue
- Wood filler
- Black paint for the frames
- Stain for the shelves
- Polyurethane for finishing
- Hat hooks
- Wood screws
- Pocket screws
- Wall Dog Screw Anchors
Easy DIY Hat Stand

Make your closet look nice with an easy and cheap DIY hat stand. This fun project is great for showing off your favorite hats. Use old items to make it special and useful. Add a bit of paint to match your style. This project is low-cost and can be changed to fit your decorations.
Prepare the candlestick to the desired height. Connect the finial (or a wooden bowl) to the candlestick using the original nail or a screw. Next, set the nail to ensure stability. Fill the nail hole in the finial with wood filler and, once dry, sand it until smooth. Finally, paint the entire assembly in a suitable color with a few thin coats to prevent drips. Allow the paint to dry, and your DIY Hat Stand is ready.
Materials:
- Wood candle stick
- Wood bowl or wood finial
- Paint- beloved pink
- Wood filler
How To Make A Macrame Hanger For Hats
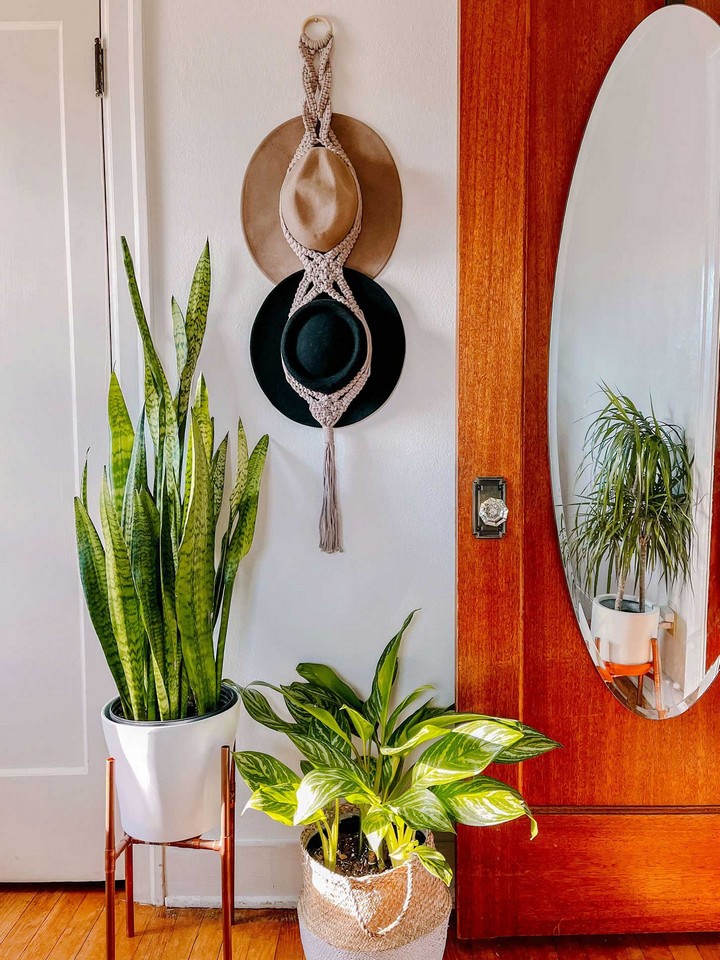
Here's another fascinating DIY project that transforms macrame into a practical hat hanger! It's a handy and trendy way to store hats. This hanger can be customized to hold as many hats as you need. Not only is it great for keeping hats organized, but it also adds a nice decoration to your wall.
Begin making this DIY project by tying the Lark’s Head knot, then follow with the Square knot. Continue repeating this until the macrame reaches a suitable length for a single hat. If you want to add more hats, keep creating sections as per the desired number. Finish the hanger’s end by tying a Gathering knot. This pattern allows you to customize your hanger by adjusting the number of hats it can hold. It provides both aesthetic appeal and a practical storage solution for hats.
Materials:
- Macrame
- Scissors
- 2.75” Wood Ring
- Measuring Tape
Baseball Cap DIY Hat Rack

Show off your love for the game with a baseball-themed hat rack. Whether you're a hardcore fan or simply need a great storage solution, this rustic piece reminiscent of a worn catcher's mitt adds a nostalgic touch to any wall.
Form with two boards, one wider than the other, cut to approximately 16 inches. Drill three evenly spaced holes in the wider board and assemble the pieces in an L shape to form a shelf. Attach the boards with screws through pre-drilled pilot holes. Apply a finish of your choice. Once dry, screw baseballs into the pre-drilled holes in the wide board, screwing through the back until they're securely attached. Attach wall hangers on the back of the unit for easy mounting. Finally, hang your baseball caps on the baseballs serving as hooks.
Materials:
- Baseballs
- 2 pallet boards about 16″ long; one wider than the other
- Sandpaper
- 3″ screws
- Drill with a drill bit slightly smaller than the screws
- Wall hangers
- Paint, stain, or sealer finish to your style