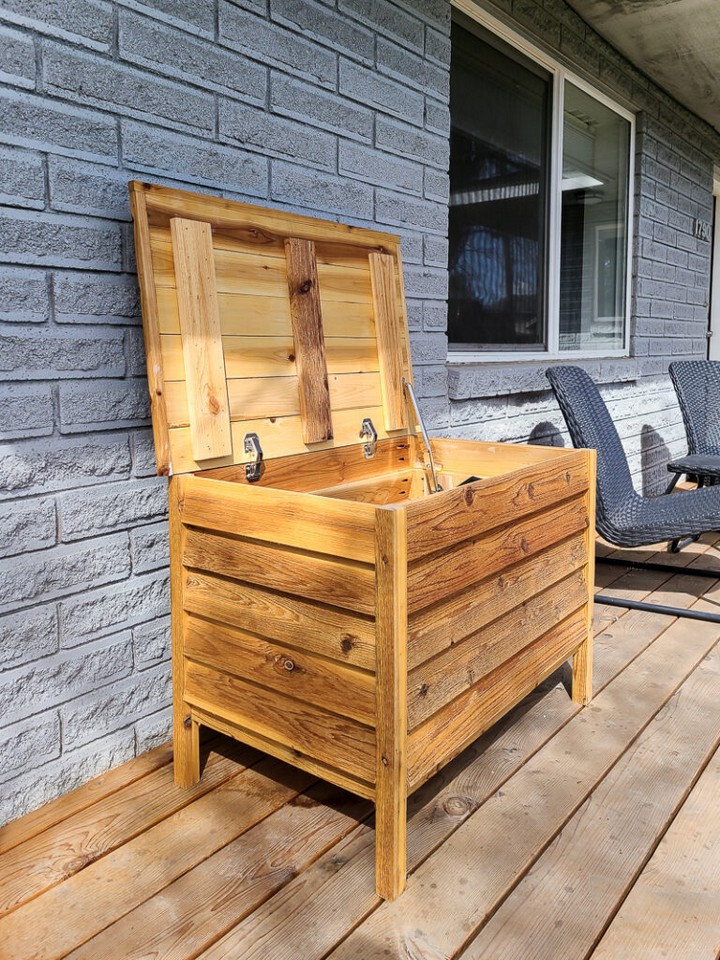
10 DIY Deck Box Plans For Storage
These amazing DIY Deck Box plans make it easy for you to create your box. You can put outdoor items like pillows, playthings, and tools in the box. It's a fun and quick task that anyone can do on their own.
DIY Deck Box Plans
With our easy-to-follow DIY plans, you can create a unique deck box that reflects your style and meets your needs. It's easier than you think by simply adhering to our guided steps. So why wait? All you need is some basic materials like wood, screws, and simple tools. So, start building these practical and stylish deck boxes for your outdoor space and add a superb storage option to your deck in no time.
How To DIY Deck Box
Adding a storage box to your deck will be a beneficial option, and here we'll tell you how:
Just get the following material on hand:
- Wood (choose a type suitable for your climate)
- Screws suitable for outdoor use
- Waterproof wood glue
- Sandpaper
- Paint or stain
- Power drill
- Saw
- Measuring tape
- Hand Sander
Making:
- First, measure your outdoor space where you plan to place your deck box. Adjust the size of your deck box depending on where you want to put it.
- Cut your wood into appropriate sizes using the saw based on your measurements. Be sure to wear safety glasses to protect your eyes while doing this step.
- After all the pieces are created, it's time to connect them together. Begin with the bottom and side pieces. Use your drill to create pilot holes, then apply the waterproof wood glue to the joints before screwing them together.
- For the top of the box, you might want to create a reasonable overhang on the lid for easy opening. Again, use screws and wood glue for a secure and water-resistant bond.
- Once your box is assembled, use sandpaper or a hand sander to smooth rough edges. After sanding, apply your chosen paint or stain and let it dry.
- You can add handles for a simple opening or even attach wheels if you want to move the box around.
DIY Outdoor Cooler Deck Box
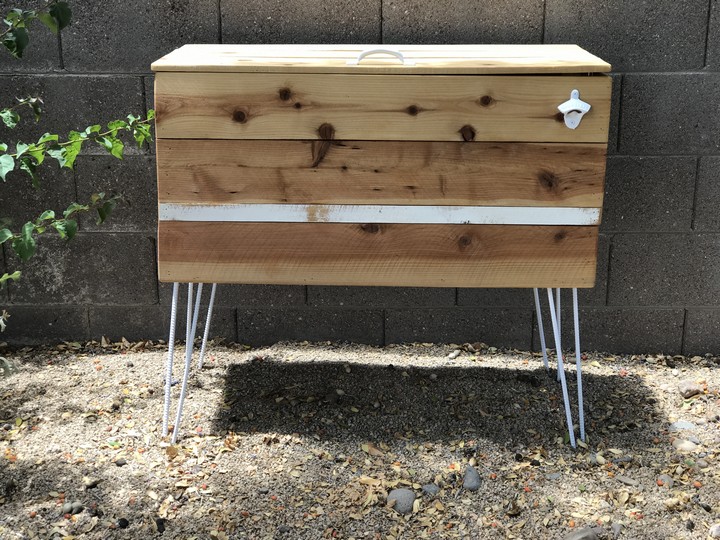
This DIY Outdoor Cooler Deck Box is a fantastic project, combining creativity, practicality, and a fun way to personalize outdoor space.
Decide the size of the box based on your cooler, then cut wood for the base, sides, and lid. Make a base by joining boards, then fix the sides to the base, ensuring they tightly wrap around the cooler. Next, place the cooler in the box, checking for the right fit. Use the remaining boards to make a lid for the box, creating an access point aligning with the cooler's lid. Affix the lid to the box with hinges for easy opening and closing. Protect the wood by applying a sealant, and finally, color the box in your favorite shade and add personal touches like stenciled designs or seat cushions.
Materials:
- Wooden boards
- Cooler
- Screws
- Paint
- Tools such as a saw, screwdriver, drill, and clamps
- Sealant
- Hinges
DIY Deck Box For Outdoor Toys
The DIY Deck Box for Outdoor Toys project is an impressive and innovative solution to organize and store your kids' outdoor toys, keeping your backyard neat and tidy.
To make a DIY deck box for outdoor toys, decide the box size and then cut wood to create the sides, base, and lid. Join the boards to form the base and attach the side panels, ensuring they are robust and secure. Place a smaller box or partition inside if you wish to separate toys. Use the remaining wood to create a lid, fixing it with hinges for easy access. Seal the wood with a weather-resistant finish to withstand outdoor conditions. Finally, add a personal touch by painting or decorating the box as desired.
Materials:
- Cedarwood
- Screws
- Hinges
- Gas struts (for soft-close lid)
- Boiled linseed oil
- Various woodworking tools
Outdoor Storage Bench

The Outdoor Storage Bench is a stylish and functional addition to any garden or patio. This do-it-yourself project merges aesthetic appeal with practical use, a testament to ingenious craftsmanship and design!
To create the Outdoor Storage Bench, first, determine how big you want your bench to be. Cut your wood to make the frames for the ends, sides, and bottom of the bench. Put these parts together to form the basic structure. Then, arrange wooden slats vertically on the sides and ends to create a visually pleasing design. Ensure the slats are attached firmly to make the bench sturdy. Craft a lid from more wooden slats and attach it with hinges so it can open and close. Give the entire bench a good sanding to make it smooth, then apply a weatherproof paint coating to protect it from the elements and make it visually appealing.
Materials:
- Wooden boards of various sizes
- 2½ inch Self-Tapping Screws
- 1¼ inch Self-Tapping Screws
- Durable outdoor paint of your choice
- Hinges
- Wood glue
- Standard woodworking tools
DIY Outdoor Storage Box With Plan
Put all your mess and delivered parcels inside this DIY outside storage box! Grab the carpentry plans for this project and start creating!
First, cut the cedar boards and pickets to the right sizes. Make holes in the boards using a tool called a pocket hole jig. Connect the boards to make a box shape using glue and special screws. Attach the pickets to the box using small nails and glue. Then, make the lid from more cedar boards. Fix the lid to the box using hinges to open and close. Polish the box with sandpaper until smooth, then cover it with a protective stain. To get full details and precise measurements, visit the project's webpage.
Materials:
- Four 2x2 cedar boards
- Nine 5 ½" x 6' cedar fence pickets
- Two 1x8 cedar boards
- Pocket hole jig
- 2 ½" exterior pocket hole screws
- 1 ¼" exterior pocket hole screws (for the lid)
- Brad nail gun and 1" Brad nails
- Stainless steel hinges
- Waterproof wood glue
- Sander and sandpaper
- Exterior wood stain
DIY Outdoor Storage Box

This elegantly made DIY Outdoor Storage Box offers a superb storage solution for your outdoor belongings and showcases the beauty of combining functionality with a touch of your own personal style.
To create the DIY Outdoor Storage Box, collect the required materials, such as mahogany or pressure-treated wood. Use a miter saw to cut these pieces of wood to the necessary sizes. After this, with the help of a pocket hole jig, drill holes into the wood pieces. You then join these pieces together utilizing a cordless drill and one-inch pocket hole screws. As you assemble the box, leave sufficient gaps between the slats, considering your local weather conditions, to safeguard your cushions. Lastly, secure a 30-inch continuous hinge and folding lid to support the box to ensure it can easily open and close. For more detailed instructions and specific measurements, visit the original tutorial.
Materials:
- Mahogany boards
- Miter Saw
- Kreg pocket hole jig
- Cordless drill
- 1" pocket hole screws
- 30" continuous hinge
- Left and right side folding lid supports
DIY Backyard Box With Hidden Storage

Create an outdoor bench that hides storage inside two rubber containers! This garden box is perfect for keeping swimming, outdoor children's toys, gardening equipment, and patio cushions out of sight.
To construct the DIY Backyard Box with Hidden Storage, start by gathering materials such as screws, hinges, paint, and boards of different sizes. Then, cut the wood according to the required measurements using a miter and table saw. Use these pieces to build the box's frame, akin to creating a compact, wall-less room. Attach boards to the frame to create the box's sides and a lid. Secure the lid to the box using T-strap gate hinges to allow for opening and closing. Finally, apply a coat of exterior paint to protect the finished box.
Materials:
- 3" Coated Screws
- 1 ⅝" Coated Screws
- 2 T-Strap Gate Hinges
- White Exterior Paint
- 2×4" Boards:
- (6) 18 ⅕ inch (Frame Legs)
- (4) 63 inch (Frame Long Boards)
- (6) 17 inch (Frame Short Boards)
- (3) 17-inch with a 45-degree angle cut in each end (Lid Supports)
- (6) 65 inch (Lid)
- (2) 10-inch ripped in half to 1.5" x 1.5" (Bottom Supports)
- 1×4" Boards:
- (3) 16 ½ inch (Under the Lid Supports)
- 1×4" Cedar Fence Pickets:
- (8) 17 inch (Short Ends)
- (8) 61 ¼ inch (Long Ends)
- (4) 29 ¼ inch (Bottom Supports)
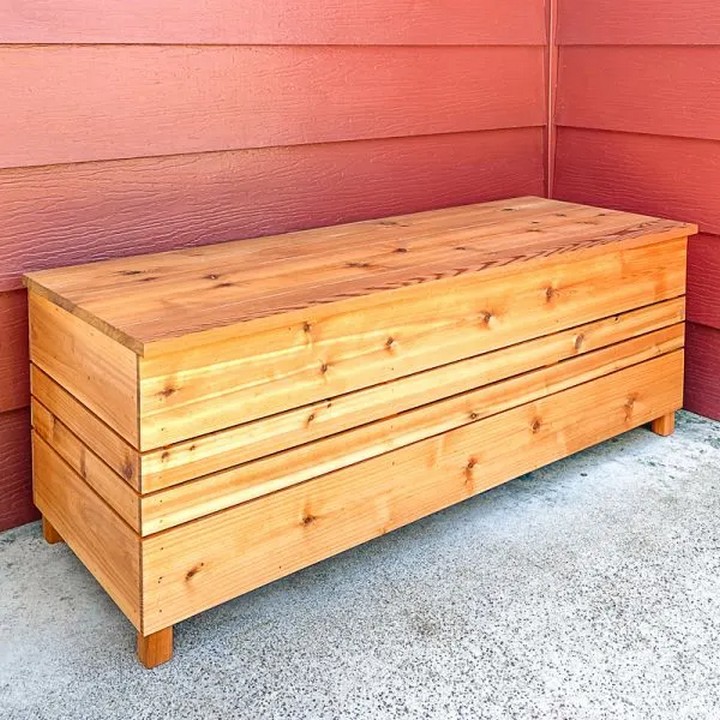
Cedar Deck Box

Bring out your crafty side and transform simple materials into a Cedar Deck Box, offering a stylish solution for outdoor storage needs. This project best suits your storage requirements and creative urges, letting you build something practical and aesthetically pleasing with your hands.
To make the Cedar Deck Box, cut the cedar boards to the necessary sizes. Construct the bottom and sides of the box, then attach the cedar pickets to form the walls. After constructing the box top, add a bug-proof screen at the bottom and beef up the lid with some plywood for rain protection. Lastly, seal the cedar for lasting durability.
Materials:
- Cedar boards
- Screws
- Plywood
- Tools for cutting and drilling
- Screen for bug protection
- Wood sealer for protection
Deck Storage Box

Make a stunning Deck Storage Box that doubles as an attractive indoor or outdoor addition. Combining elegance with functionality, this woodworking project allows you to create a versatile piece that serves its storage purpose and complements your home decor.
To create the Deck Storage Box, cut your chosen wood into pieces of the necessary sizes and shapes. Secure connections between the side and bottom pieces using mortise and tenon joints. Assemble the box, adding screws for firmness if necessary. Design and construct a refined lid using router techniques. Attach a stay to ensure the lid shuts gently without slamming. Finally, refine your box by sanding, finishing, and sealing the wood to shield it from the elements.
Materials:
- Sapele wood or an alternative (white oak, mahogany, ipe, or cedar)
- Mortise and Tenon joint hardware
- Screws
- Tools for cutting, shaping, and drilling
- Lid stay hardware
- Sandpaper
- Wood finish and sealer
DIY Outdoor Storage Box

Your DIY Outdoor Storage Box is a great achievement. This project gives you a handy place to store outside items and creates a nice piece of furniture that fits well with your outdoor surroundings. Clever and eye-catching, this project combines looks, usefulness, and simplicity.
To build a DIY Outdoor Storage Box, cut and sand your wood according to the desired box dimensions—drill pocket holes in the wood for assembly. Construct the box's frame with outdoor-grade paint, then affix the outer slats, inner sides, and bottom.
- Wood (suitable for outdoor use)
- Outdoor-grade paint
- Screws and other hardware
- Sandpaper or a sanding tool
- Drill for creating pocket holes
How To Build A 3-In-1 Deck Box

The 3-in-1 Deck Box project is a quick way to show off your great skills. This handy creation is great for keeping things put away, and you can use it as a bench or table. It shows your smart way of solving problems because it mixes good looks, flexibility, and ease of use nicely.
Materials:
- 3 - 2x4x8' Sienna Lumber
- 10 - 1x6x6' Sienna Fence Board
- 4-5 / 4x6x8' Sienna Deck Boards
- 1 Box of 3" Deck Screws
- 1 Box of 1 - ½" Deck Screws
- 1 Box of 2" Deck Screws
- 1 Box of 1" Crown Staples
You can also see:
- DIY Plant Stand Ideas: Are you looking for a special yet easy way to show off your best plants, whether on your balcony, porch, kitchen or inside your house? This great list of DIY plant stand suggestions has something for everyone.