10 Simple DIY Tin Can Crafts
Explore the creative and eco-friendly world of DIY Tin Can Crafts. So, roll up your sleeves and transform ordinary objects into delightful decor pieces, then you're in for a treat. These tin can crafts reign supreme for their ease and thriftiness and have limitless potential. Our featured projects, including the Red, White, and Blue Patriotic Painted Tin Cans and intricate Tin Can Pumpkins, will demonstrate how easy it is to make stunning rustic decorations from mere tin cans. Don't underestimate the humble tin can – it holds endless creative possibilities. Whether you're a seasoned DIY enthusiast or a beginner crafter, these tin can craft ideas are versatile, achievable, and sure to add charm to your surroundings without requiring much effort.
DIY Tin Can Crafts

Our ideas are fun and designed with simplicity and ease in mind. Whether you celebrate patriotic fervor with painted tin cans or welcome autumn cheer with tin can pumpkins, each project is a launching pad for creativity. Following the straightforward steps we've laid out, you'll find that creating charming tin can crafts is within everyone's reach. So gather those tin cans, and let's empower you to craft your stellar can creations infused with your personality and flair.
Monster Pencil Holders

Looking to add a touch of fun and creativity to your desk? Consider making Monster Pencil Holders. The process involves wrapping empty aluminum cans with colorful yarn to make playful, lively-looking monsters. You can secure the yarn using either glue dots or hot glue. Give each monster its unique personality by sticking googly eyes of various sizes to the can. Not only would these make for a charming addition to any workspace, but they also make for a great craft project that both children and adults can enjoy.
How To Make A Recycled Tin Can Owl
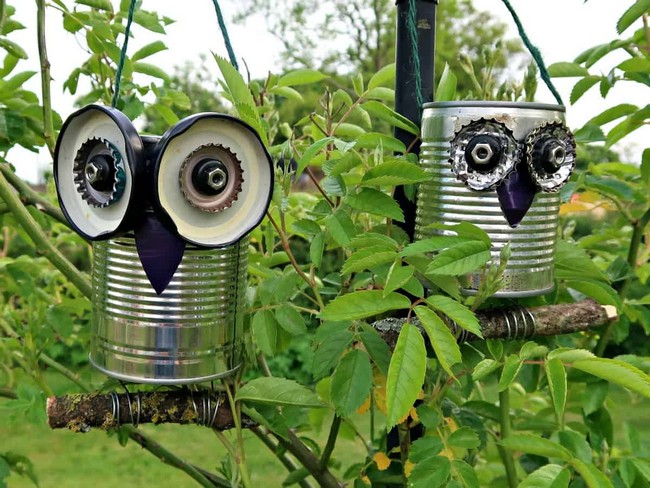
Create a delightful recycled tin can owl to decorate your garden, or use it as a unique windowsill planter. To make this charming craft, gather a clean, empty tin can, metal scraps (including bottle tops, washers, and nuts), a stick, metal adhesive, gaffer tape, wire snips, a hammer, and a nail. Start by constructing the owl's eyes from coffee pod cut-outs and other metal pieces. Use the hammer and nail to make holes in the can for hanging or drainage. Add a beak crafted from coffee pods or aluminum drink cans, followed by the eyes. For legs, wrap two wire pieces around the stick to form feet and attach them to the can body with gaffer tape. Finally, thread hanging wire through the holes, and your tin can owl is ready to beautify your space.
How To Make A Decoupage Tin Can Wind Chime

To make a unique decoupage tin can wind chime, collect three different-sized tin cans, an old spoon or fork, and some garden twine. After removing labels and drilling a hole in each can base, spray paint the cans in vibrant colors and allow them to dry. Next, apply songbird images onto the cans using decoupage glue, positioning them to overlap when the cans are hung together. Once dry, seal the images with a coat of acrylic spray varnish for protection from the elements. Thread the twine through the holes in the cans in descending order, adding knots to secure them in place. Attach the spoon at the bottom of the twine so it rattles against the cans, creating soothing sounds. Tailor the chime to your liking by adding more cutlery for varied acoustic effects, crafting a melodious and visually pleasing addition to any outdoor space.
Makeup Organizers Using Tin Cans And Fabric

Craft stylish and budget-friendly makeup organizers using discarded tin cans and leftover fabric scraps. After ensuring the cleaned cans have no harmful edges, measure and cut the fabric into pieces long enough to wrap each can. Secure the fabric using a hot glue gun, applying the glue in vertical lines along the can as you wrap the fabric. Tuck in or trim any fabric overhanging at the top. Once complete, these chic storage units are ready to house your makeup brushes, lipsticks, and eyeliners. This easy, fun project provides a unique way to recycle while creating bespoke storage for your vanity or bathroom.
Easy To Make Colourful Tin Can Planters

Creating colorful tin can planters presents a beautiful way to spruce up your garden or indoor space. For this project, you need 12 empty tin cans, various paint colors, a paintbrush, an acrylic varnish spray, and a wooden pallet for a holder. First, paint each can in a different color, then let them dry and spray with a varnish to waterproof them. For the pallet holder, remove a wooden plank from the pallet, sew off the bottom rung, and nail the plank to the sawn-off piece, creating a trough-like holder.
Once sanded smooth, this holder can accommodate your rainbow of planters perfectly. Before planting, drill some drainage holes at the base of each can. Fill the cans one-third of the way with small pebbles, then add a layer of activated charcoal to aid in water absorption, followed by a layer of sand. The final top layer should be potting compost, where you can nestle your bedding plants. Thanks to the convenient pallet holder, these planters add a burst of color to your space and are also easily movable.
Bunny And Chick Tin Can Easter Crafts

Put your hands on these adorable Bunny and Chick figures using recycled tin cans for a fun and festive Easter craft activity. Thoroughly clean the cans and then spray-paint them in appropriate colors for a bunny (white) and a chick (yellow). Once dry, use felt or craft paper to cut out eye, beak, foot, and ear shapes for the chick and bunny. Secure these features using a hot glue gun to bring the characters to life. Embellishments such as ribbon bows or fluffy tails can be added for extra festive appeal. These tin can crafts are a fun, budget-friendly, and engaging way to celebrate Easter, offering a delightful alternative to traditional egg decorating. Materials are easily found in craft stores, dollar stores, or online platforms.
How To Make Gold-Crushed Can DIY Planters

Add a touch of glamour to your indoor space within minutes by creating chic gold-crushed planters from ordinary tin cans. Hammer the cans gently to achieve a crumpled effect, ensuring a usable shape by rotating the can as you hammer. After achieving the desired crumpled look, spray the cans with chrome gold paint to infuse glamour.
Once the paint has dried, protect it with a coating of clear acrylic varnish. To convert these stylish containers into functional planters, add a layer of gravel to the base for proper drainage, then fill with compost and succulent plants. Succulents with pineapple top-like leaves create an interesting theme, especially if you place these planters on a pineapple-stenciled table, achieving a "shabby glam" aesthetic that brightens any indoor space.
Dollar Store Floral Decal Tin Can Craft

Elevate your home's aesthetic with an upcycling project that turns ordinary tin cans into elegant decorative items. Start with a clean tin can as your canvas and decorate it with floral decals, which you can find at any dollar store or by cutting shapes from decorative scrapbook paper. Adhere your chosen floral elements onto the can, and if using paper, secure it with a layer of Mod Podge, allowing it to dry before adding another layer as a sealant. The result is a bespoke, floral-themed craft that reuses everyday items and adds a splash of beauty and personality to any space. These decorated tin cans can serve multiple purposes, from holding stationery to nurturing small plants while displaying your crafty flair.
Red, White And Blue Patriotic Painted Tin Cans

Bring a patriotic spirit into your decor with Red, White, and Blue painted tin cans that can serve as charming vases. Start with empty tin cans as your canvas, coat them with chalky finish paint in white, and give a second layer if needed for full coverage. Once dry, create a blue can adorn with white stars by sticking star-shaped stickers and painting over it, removing the stickers when the paint is tacky.
For the remaining cans, use hand-painted red stripes to create a rustic look, or use masking tape for a more defined look. Finally, gently rub the painted cans with sandpaper and give them a lightly distressed, vintage appeal. These vibrant cans can hold your favorite summer blooms or work as centerpieces for patriotic celebrations, adding a festive touch to any space.
Tin Can Pumpkins

Add a touch of harvest charm to your decor with DIY Tin Can Pumpkins. This eco-friendly project transforms your discarded soup and vegetable cans into delightful pumpkin ornaments. Clean the cans, then paint them with orange paint; chalk paint offers excellent adhesion to metal.
Using a hot glue gun, affix a backyard stick on each can to serve as a faux "stem," and dab some Spanish Moss to conceal the glue. Further, decorate your pumpkins as you wish: for example, embellish them with a leopard print fall leaf, a raffia bow, and a sunflower head for a distinct fall motif. These charming creations can serve as a unique centerpiece for fall dinners or an addition to other seasonal decor, making recycled craftsmanship a cherished part of your autumn festivities.